CLICK HERE FOR FREE BLOGGER TEMPLATES, LINK BUTTONS AND MORE! »

Followers

Monday, December 26, 2016

Spectrum Noir Tutorial


Edited:Just noticed, my tutorial ever posted so here it is.

First cut a piece of watercolor card to size.

Then scribble the Spectrum Noir Aqua markers onto a stamping mat or acrylic block. This card uses Moss and Navy.

Stamp the tree stamp in to the ink and on to the card.


Using a waterbrush, blend the color so that it is not quite as blotchy.


Add some shading around the trees using Slate.


Optional: go around the outline with a fineliner just to give it a bit more detail.


Cut the image down to size and layer it onto black card.


Layer the image onto the card and add a die cut sentiment. Finish it off by adding some snow and glitter


Pop over to the Spectrum Noir Blog for more inspiration.


Fi
x

Sunday, November 20, 2016

When Santa got Stuck up the Chimney...


Hi folks...

today I am sharing my late DT card for My mum's Craft Shop.  I just gota little buy on Friday and forgot to post this.


I have used Santa is Stuck from Stamping Bella...he is such a cute little Santa to colour and is available now from the My Mum's Craft Shop store.  I have used my brand new Spectrum Noir Illustrator pens to colour this one...oh man they are sooooo juicy I love them!

The papers I have used are from Echo Park....which are cute too!

challenges:
C.R.A.F.T. Challenge - Christmas
Cute Card Thursday - Christmas
Christmas at Sweet Stampin - anything goes


Fi
x

Thursday, November 17, 2016

It's another Beautiful Day...

Hi folks, today I am sharing my DT tutorial for My Mum's Craft Shop...


When I last made a card using this stamp, I did receive lots of comments so as it is bacck in stock now over on the My Mum's Craft Shop store, I thought I would show you what I did.

First I cut a piece of watercolour card to size.

Using the Altenew Beautiful Day stamp set, I stamped up the flower and leaf using a veramark pad and then embossed the images with white embossing powder...I love white embossing with watercolouring.

Using my Zig clean Color Brush pens I first started colouring the leaves, just started with some colour at the stem ends and worked the colour out with a waterbrush.

Next I started in the centre of one of the flowers and not really being too precise, I coloured some yellow in the centre of the flower.

I then added some pink around the outside edges, this makes it easy to pull the colour from the edges and to blend with the yellow.

Using my waterbrush, I blended the yellow and pink together and then did the came on the next flower.

I just kept using the same process until all the flowers had been coloured.

I then went over all flowers and leaves added more colour util I got the shade I wanted....these pens are so vibrant you don't actually need that much colour.

I like to add shading around the images but instead of a normal greyish shadow I pulled the colour out from the flowers.... I think this is quite effective and it's a great way to cover up colour that has gone over the outside of the images.

I then loaded my waterbrush with colour and slashed some little splodges of colour...and then once dry I added some black splodges.


Here's the finished card.


products used:

challenges:
Less is More - one layer


Fi
x

Friday, November 04, 2016

Hope you perk up soon...


Morning folks, today I am sharing my DT card for My Mum's Craft Shop.

I have gone for the clean and simple look this time...not sure if it's just too plain for me as it's not my usual.....but I really loved the stamps and wanted to use them.

So the stamp I have used is from the Altenew Coffee Talk stamp set.  I stamped the wording onto kraft card, then added some splodges....these splodges are one of the stamps in the set.  I found a cup to use and coloured it with my Spectrum Noir Pens and then added some sequins to finish.


Fi
x

Wednesday, November 02, 2016

Spectrum Noir November Challenge


Hi everybody...have you seen the challenge over on the Spectrum Noir Facebook page??

This month's theme is "anything goes" with a Christmas twist... now how easy is that??  All you have to do is use some of the Spectrum Noir products.

I have used Spectrum Noir Aqua Markers for this months challenge.

For this card I stamped the image onto watercolour card, I scribbled the Aqua en onto acetate and lifted the colour with my waterbrush and coloured the image.

I did some fussy cutting and cut out the image and layered it onto my card.

You can also pop over to the Spectrum Noir blog to find out loads of tips and techniques on using all your Spectrum Noir products.


Fi
x

Sunday, October 23, 2016

Spectrum Noir tutorial


Hi everybody, here's my tutorial for this month using Specrum Noir Aqua Markers

First I cut a piece of card to size.


Nxt using a versamarker pad, I inked and stamped one of the stamps from Sheena Douglas - Ageing Beautifully set onto the watercoulour card and then embossed with gold embossing powder.


Next using the Navy Spectrum Noir Marker, I scribbled some colour onto acetate and using my paint brush loaded with water, I lifted the colour and brushed over the embossed image very randomly.


Next I added some splodges of colour using Moss and Navy, again I lifted the colour and sprayed it using the brush.


I then wanted to add more splodges for some more texture so I added some splodges of water which lifted the colour from the card and some black ink splodges...and that's it easy peasy!


Next I stamped, coloured and embossed the flowers and leaf using Moss and Navy, once dry I cut them out.


Hey presto...here's the finished card, I added some sequins and gems to finish!


Fi
x


Friday, October 21, 2016

It's another beautiful day...


Hi everybody,  sharing my DT card for My Mum's Craft Shop today.

Now this stamp set is from Altenew called Beautiful Day and it is really a beautiful set.  I thought I would try something different since I managed to get my scan n cut to actually work!  It's not the image I had in my head...but I guess it's really the first time I have used the scan n cut to cut everything, so I'm pleased.

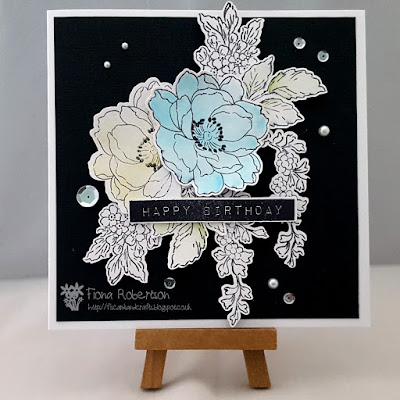
So first I stamped the flowers, leaves and flourishes onto watercoloured card and then I die cut them. I then very subtly coloured the flowers with watercolour pens. I decided to leave some of the image in white as I thought it actually looked quite cool.  I layered it all up and mounted onto black cardstock and added a sentiment and some pearls and sequins.

for this card I used:


Fi
x

Sunday, October 16, 2016

It's a Beautiful Day...


Hi folks, a wee card from me today!

I have been waiting so long for this this stamp set to be back in stock and couldn't believe it when I noticed it was available in My Mums Craft Shop.

Now initially I was trying to stamp and cut out the images with my scan n cut but was having a bit of trouble however the lovely Janine and Cass soon sorted me out but that card is work in progress so in the meantime I made this one.

I white embossed the flower and leaves and then watercoloured them using my zig clean colour brush pens (omg I love these pens).  I gradually added more layers of colour and then once I was happy I then dragged out some of the colour from the flower and leaves to add a bit of subtle shading around the images.  I stamped the sentiment with black ink and layered on top.

I then added some black splodges, sequins to finish.

products used:

challenges:
Addicted to Stamps - embossing
Allsorts - Pink October
Colour Crazy challenge - anything goes
Simon Says Stamp - totally resistable (white embossing)


Fi
x


Sunday, October 09, 2016

Birthday Wishes


Hey folks..a wee post from me today!

So I have been having a bit of dilema on whether to sell my scan 'n' cut machine as I have used it only a few times however some crafty friends have been putting me off selling  So today I decided to make the effort and use it....and here we are...

I stamped the leaves and then scanned and cut them and then coloured with my zig clean color brush pens...I do love my pens!

So first I stamped and embossed the background in gold sparkle embossing powder, I then lightly added some colour using the zig pens.

Once dry I arranged and layered up my leaves and little acorns onto the gold embossed background.  I then die cut the "birthday" word and layered on top of the leaves.

I added a few black splodges and some sequins to finish!

products used: Winnie and Walter Renees Leaves, MFT Morroccan Background, MFT Cause for Celebration die, Zig Clean Colour Brush Pens.


challenges:
Seven Hills Crafts - Colour challenge
Addicted to Stamps - embossing
Addicted to CAS - watercolour
Cute Card Thursday - anything goes


Fi
x


Friday, October 07, 2016

Trees in the Forest


Hey all, here I am with my DT card for My Mums Craft Shop.

Now I did buy this die set a few weeks ago but only now got around to using it...I have to say I just love trees...aren't they cute!  Unfortunately they are out of stock at the mo but new stock arrives every week!


I made a watercoloured background, die cut the trees and coloured them up with watercolours too and then layere them up...so easy!

I added some splodges and sequins to finish.

Pop back for some more inspiration from the team.

Fi
x

Sunday, October 02, 2016

Some Autumn leaves...


Happy Sunday!!

It's a lovely day here in Scotland, so got the washing out and going to do some stuff in the garden but before that I thought I would share my card with you.

The lovely Brenda asked me if I would like to be guest designer over at Stamping Sensations this month.  The them is autum so here's what I made.

The papers are from The Sweet Shoppe and the image is MFT Geometric Greenery.  I white embossed the image and then coloured with my Zig pens.

Hope you likey!

challenges:
The Ribbon girl - anything goes
Deep Ocean Challenge - anything goes
Dream Valley Challenge - embossing


Fi
x

Sunday, September 25, 2016

Animal Shelf


Hi folks, hope you are all well!

Here I am sharing my card I made for one of the girls at work to give to her daughter.

I used papers from LOTV and layered them onto white bazzill card.  I added a piece of lace to one of the layers.  The image is from di's Digis called Animal Shelf which I coloured with Spectrum Noir blendable pencils.  I added some flowers and ribbon and slotted in a dummy charm...you can just about see it!

I finished with some pearls and sequins....hope you likey!


challenges:
The Ribbon Girl - anything goes
ABC Challenge - P for pearls
Noor Design - flowers and lace
Di's Digis - ribbon, lace, flowers
Sweet Stampin - buttons and/or ribbon
Deep Ocean Challenge - anything goes


Fi
x


Friday, September 23, 2016

Love & Thanks

Hi folks, today I am sharing my tutorial for Spectrum Noir.
First I coloured a piece of watercoloured card using Marine, Bud Green and Kingfisher Spectrum Noir Aqua Markers.


I laid background aside to let it dry and stamped and white embossed the trees.


Next I coloured some sections of the trees randomly using Moss Green and Cobalt Spectrum Aqua Marker.  I then loaded my brush with water and brushed over each of images.


I gradually added more colour until I got the required shade and so it would stand out against the background.


Next I cut out each of the images, being extra careful not to cut off any of the white embossing.


I laid the trees aside and moved back to the background, now that the background has dried I added some splashes of water, the water reactivates the color.


Next i added some splodges.


And then I thought the background would look extra cool with some additional splodges so I white embossed a few more splodges.


I then added sticky fixers and layered the trees onto the card, added some pearls, gems and sequins and of course the sentiment.


Pop over to the Spectrum Noir Blog to find more tutorials using the Spectrum Noir range of products.

Fi
x

Feel Better Soon...


Here I am with my DT card for My Mum's Craft Shop....and I actually remembered to post it!!

Todays card has been made using the Altenew Bamboo Rose stamp set.


I white embossed the flowers and sentiment and coloured the image with Spectrum Noir Aquablend pencils...I just used a few colours and built up the layers.

I added some ribbon and sequins to finish.

Pop back for some more inspiration from the team.

Fi
x

Saturday, September 10, 2016

Celebrate


Oops I did it again....a bit later than planned!

Here's my DT card for My Mum's Craft Shop.

Today's card has been made with a coupleof stamps from different companies.  The background is made using MFT Whimsical Background and the sentiment is from Avery Elle Big Greetings.

First I white embossed the background and then added some colour using my Spectrum Noir Aqua Markers...I just randomly added colour to some of the sections then I brushed over the whole background with water...it's a cool efffect and the colours blend. I then stamped the wording and die cut it and then layered it onto the background.


Pop back for some more inspiration from the team.

Fi
x

Saturday, September 03, 2016

More flowers...


Hi folks...sorry I haven't been blogging all the time recently but you know how it is.....work!!

So back on track with my DT card for Spectrum Noir.

Noow you might think you've seen this one before but you haven't I am just loving the Tim Holtz stamps, they make the colouring so easy!

I white embossed the flowers on to watercolour card, I then coloured the flowers using my Spectrum Noir Aqua Markers, I started with the lightest colours and gradually added the darker colours blending them altogether.  Once I finished the colouring I went over the flowers with a clear Spectrum Noir glitter pen...I then added some splodges and sequins to finish.

products used:
Spectrum Noir Aqua Markers -peach, fawn, yellow, red violet, scarlet, sunflower, crimson, sunset, orchid, lime, moss, slate
Tim Holtz - Flower Garden


You can also pop over to the Spectrum Noir blog to find out loads of tips and techniques on using all your Spectrum Noir products.

Remember you also enter the challenge over on the Spectrum Noir Facebook page...here!

challenges:
Simon Says Stamp - anything goes

Friday, August 26, 2016

Make a wish...


Here Iam with my DT card for My Mum's Craft Shop....I forgot to schedule this morning!

Today's card has been made using MFT - make a wish stamps but unfortunately are out of stock but will be back in soon.


First I white embossed one of the sentiments from the set and then I brushed some colour over the background and then spritzed with water to give it a bit of texture. I stamped the candles into watercolour ink and then stamped onto watercolour card and then once dry I cut them out.

I added some sticky fixers and the layered the candles onto the card.

I distressed the edges of the card and layered it onto some black card.

Pop back for some more inspiration from the team.

Fi
x